Episode 1
Bevy Tutorial: Build Your First 3D Editor - Create a 3D Space on an Infinite Grid
On AI assistance
I’ve been following the Bevy 0.19 release and kept asking myself: what’s something cool to build with all the new building blocks 0.19 is shipping? I tinkered around and ended up with a small 3D editor inspired by Blender.
A 3D editor sounds big, but our focus is a simple scene editor to build environments, place enemies, etc. Any game that has a world needs some way to author it.
In this series we’ll build a simple one for exactly that purpose, something you can extend however your game needs. The nice part about building this in Bevy is that your editor and your game share the same ECS, so the scene you save is the scene your game loads.
Which brings up the usual question. Should you actually build your own game editor, or wait for the official one, or just hand author your scenes in code? I’m not touching that debate with a ten-foot pole. Whatever you pick, someone in the internet will tell you you’re wrong anyway.


Here’s what I plan to cover in this tutorial series:
- A mini 3D editor inspired by Blender
- Move, rotate, and resize with keyboard shortcuts
- Change object materials, create a toon shader
- Save and load scenes
- Import GLTF models
Everything listed above will ship as free blog posts. That part is settled. What I haven’t figured out yet is whether there will be any extra material beyond this list, and if so, whether it would be pay-gated. So treat the free posts as the plan, and anything past them as a maybe.
In this tutorial, we will focus on the following:
- A small 3D scene you can move around in like Blender
- A grey cube in the middle
- An infinite ground-plane grid with a red X axis and a green Y axis
- A camera to orbit around the 3D space.
This tutorial assumes you’re comfortable with structs, enums, associated functions and closures, all covered in our Bevy 2D Game Development series, Chapters 1–7. If any of those feel shaky, those chapters are free and worth a read first.
Project Setup
The source code for the series and each episode is available in this repo.
cargo new bevy_tutorial_editorcd bevy_tutorial_editorReplace Cargo.toml with:
[package]name = "bevy_tutorial_editor"version = "0.1.0"edition = "2024"[dependencies]bevy = "=0.19"# Bevy's recommended dev build profile..[profile.dev]opt-level = 1[profile.dev.package."*"]opt-level = 3Scene Setup
Every 3D scene needs exactly three things to be visible:
- A camera, something to look through
- A light, something to illuminate the scene
- A mesh, something to look at
Let’s start here and see where it leads.
use bevy::prelude::*;Every Bevy program starts the same way: build an App, register what it should do, then call run(). The app then loops forever, ticking its systems each frame.fn main() { App::new() .add_plugins(DefaultPlugins)Pulls in ~20 built-in plugins at once: the window, the renderer, input handling, and asset loading. .add_systems(Startup, setup_scene)Run setup_scene a single time, at startup. .run();}Bevy runs this for you, you have to mention when it needs to be triggered. Also note we don't pass arguments when adding it as a system (explained later).fn setup_scene( mut commands: Commands,Lets you change the world, spawn entities (player, enemy, objects) and attach components to them. Bevy applies the changes once the system finishes. mut meshes: ResMut<Assets<Mesh>>,Lets you add or remove meshes, the app's shared store of every mesh shape. mut materials: ResMut<Assets<StandardMaterial>>,Lets you add or remove materials, the app's shared store of every surface look.) {Without a camera, nothing is drawn. Its Transform places it back and above the origin, then aims it at the centre of the scene. commands.spawn(( Camera3d::default(), Transform::from_xyz(3.0, 3.0, 8.0).looking_at(Vec3::ZERO, Vec3::Y),from_xyz sets the position; looking_at rotates it to face the origin. ));A DirectionalLight shines like the sun, parallel rays from a single direction, set by its Transform. illuminance is its brightness. commands.spawn(( DirectionalLight { illuminance: 5000.0, ..default() }, Transform::IDENTITY.looking_to(Vec3::new(-1.0, -2.0, -1.0).normalize(), Vec3::Y), ));Cuboid::new(1.0, 1.0, 1.0) is a box 1 unit on each side , its width, height, and depth (in Bevy, 1 unit is 1 metre, so this is a 1-metre cube). add stores the mesh and hands back a lightweight handle the entity holds, rather than the data itself. commands.spawn(( Mesh3d(meshes.add(Cuboid::new(1.0, 1.0, 1.0))),The "what shape to draw" component. meshes.add(...) registers the 1×1×1 cube and returns the handle Mesh3d wraps. MeshMaterial3d(materials.add(StandardMaterial {The "how the surface looks" component, here a grey, fairly matte material. base_color: Color::srgb(0.7, 0.7, 0.7), perceptual_roughness: 0.85, ..default() })), Transform::IDENTITY,No translation, no rotation, scale 1, so the cube sits right at the world origin. ));}Building things by composition
In Bevy, everything in your world is an entity represented by a unique ID. A camera is an entity. A light is an entity. A cube is an entity. So is player, enemy, etc. The ID itself means nothing; what shapes it is the data you attach to it, called components.


Spawn Command
commands.spawn((…)) creates an entity and composes it from parts in one call. Like assembling from pieces: you pick the parts that describe what you want, hand them to spawn, and Bevy creates it. Want a camera? Compose Camera3d + a Transform that says where it sits and what it looks at. Want a cube? Compose a mesh shape, a material, and a position.
Any combination of components is valid Rust, Bevy ignores ones it doesn’t recognise. The interesting question is which combinations the renderer responds to, and you’ll build up instinct for that as the series progresses.


How does setup_scene get its arguments if we never call it ourselves?
This is one of Bevy’s nicest tricks. When you write add_systems(Startup, setup_scene), you’re handing Bevy the function, not calling it. Bevy inspects its parameter types and at runtime fetches each one from its internal world automatically.
fn setup_scene( mut commands: Commands,"Bevy, give me a way to create entities." mut meshes: ResMut<Assets<Mesh>>,"Bevy, give me the mesh storage." mut materials: ResMut<Assets<StandardMaterial>>,"Bevy, give me the material storage.") You never wire these up. Bevy sees ResMut<Assets<Mesh>> and knows exactly which resource to pull from the world.
cargo runThe first build will take a few minutes. Bevy is a large engine and this is a cold compile of every dependency. Subsequent builds are fast.
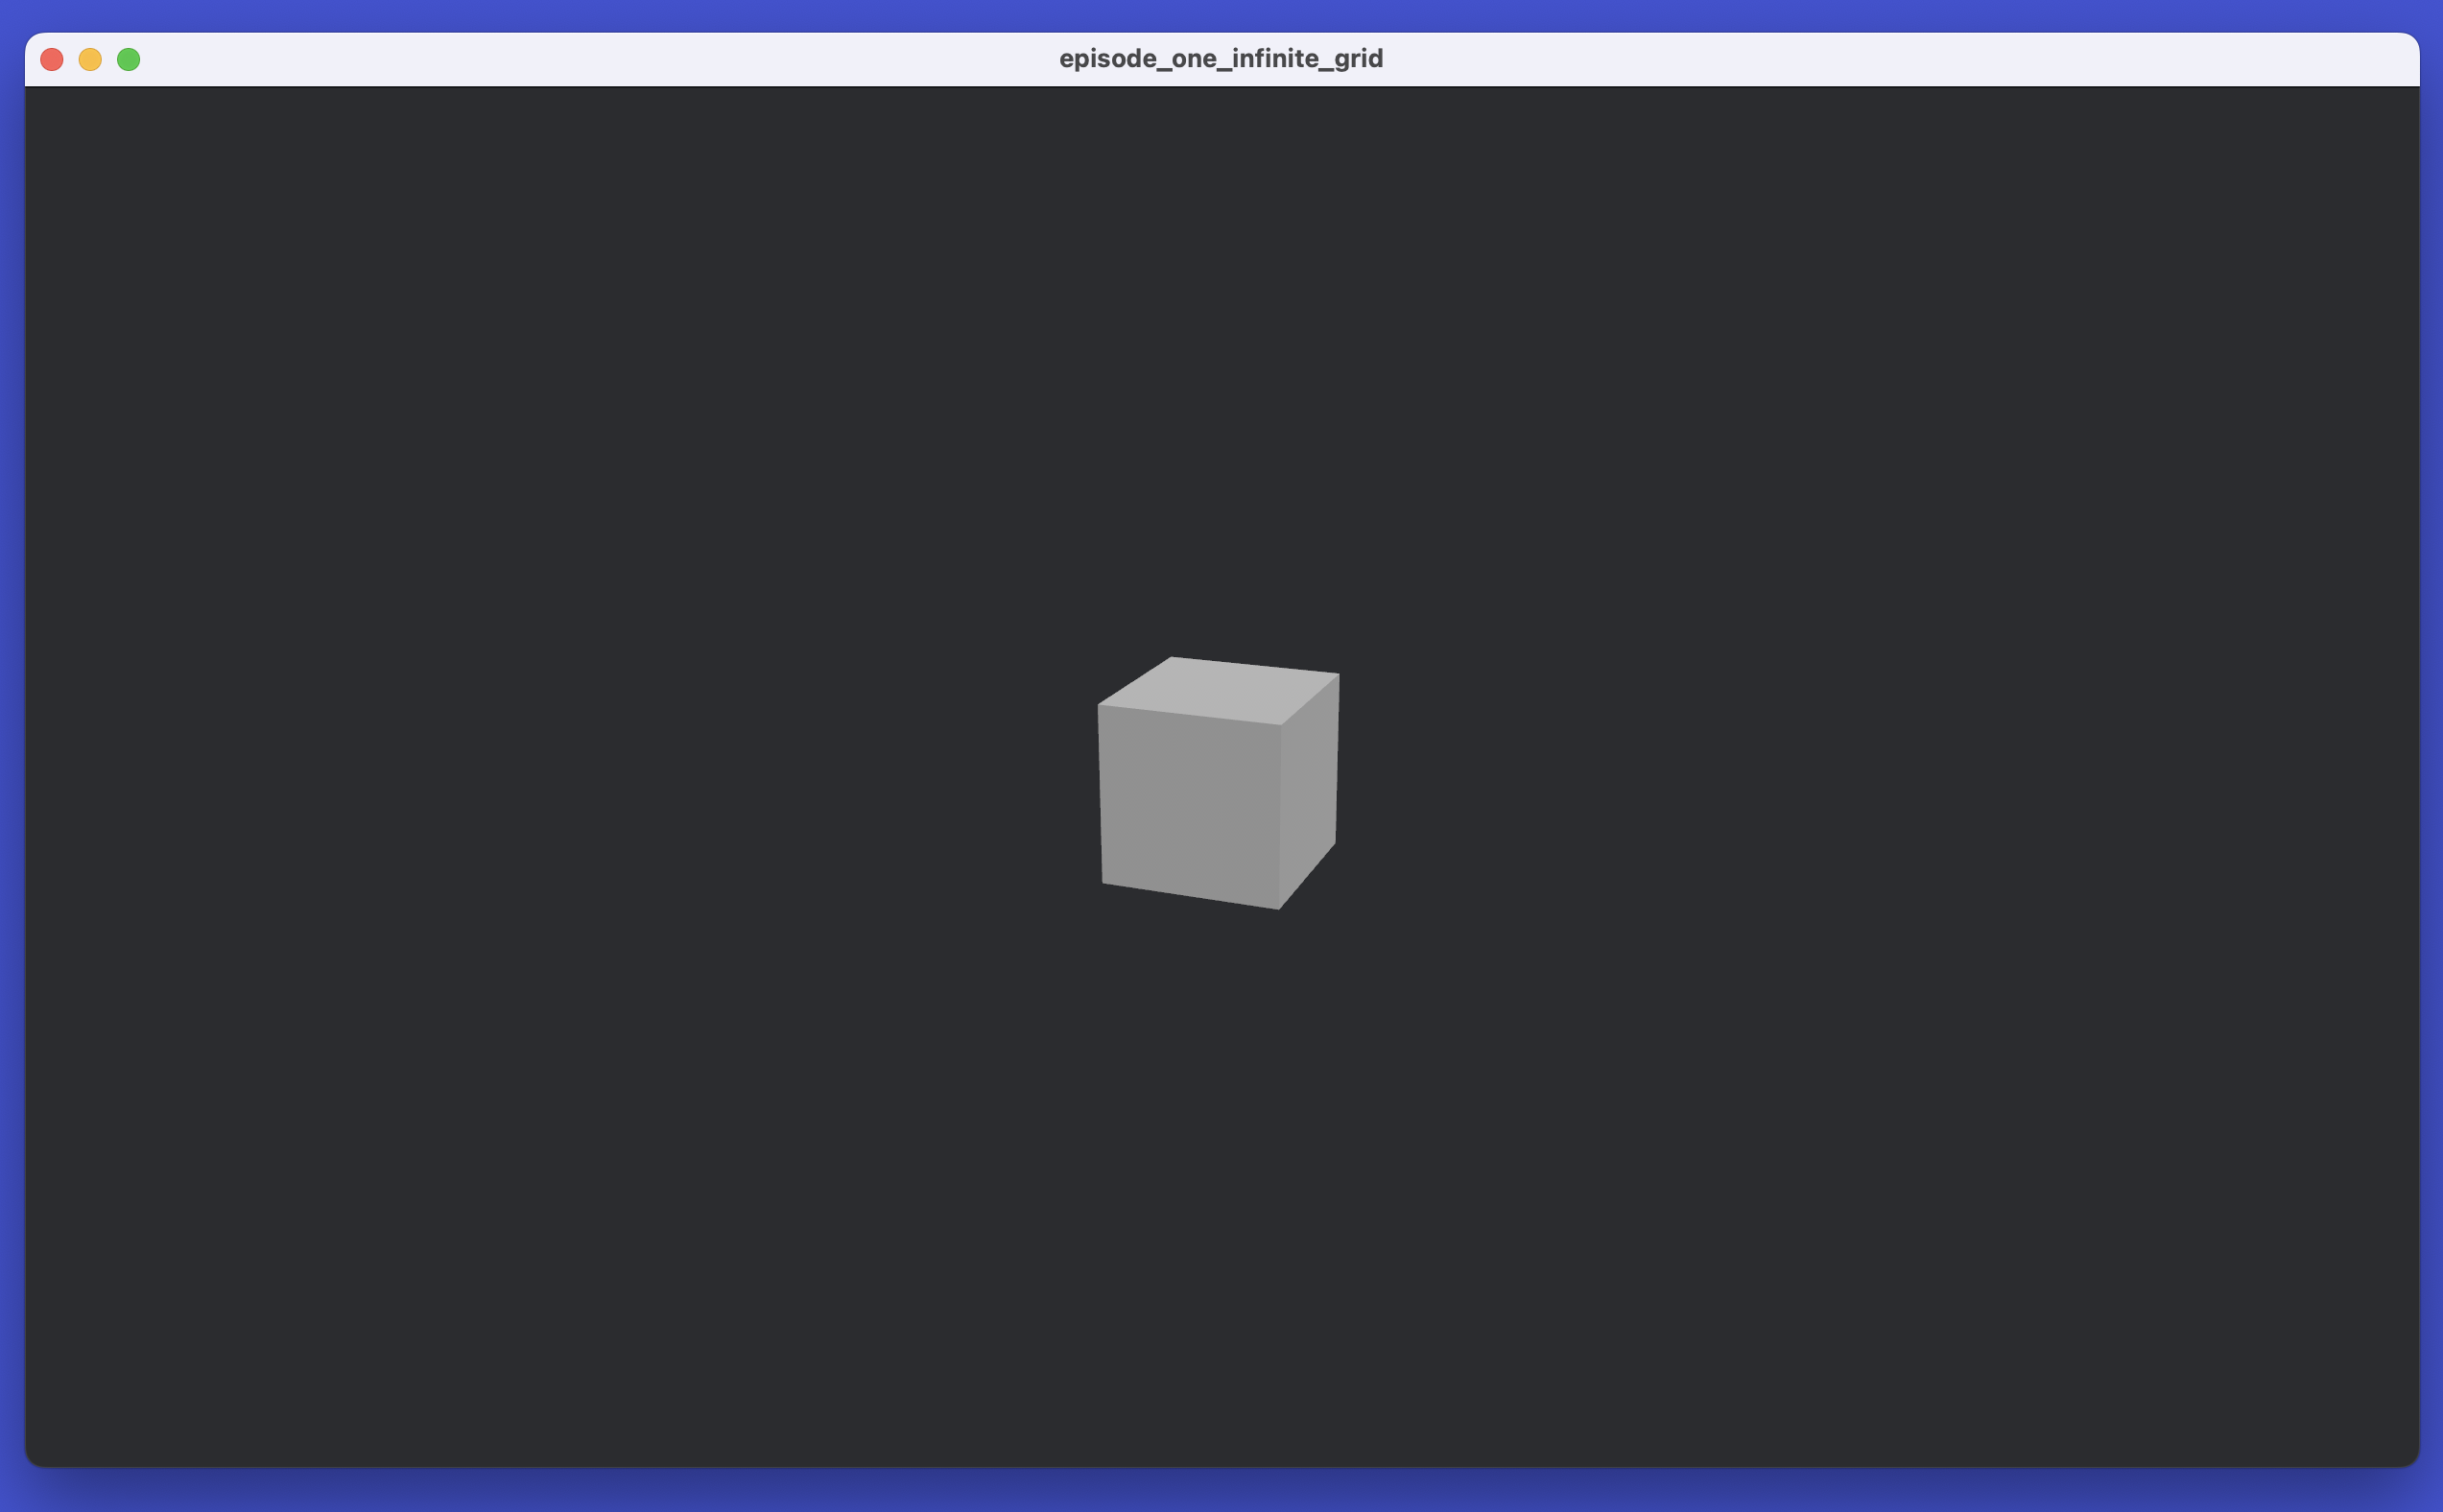
You should see a window with a grey cube.
Viewport Camera Setup
A static camera doesn’t help much, you can’t inspect the cube from different directions. We want Blender-style viewport, and we’ll support both a mouse and a trackpad.


To do that, we need a camera that responds to user input, turning mouse and trackpad motion into orbit, pan, and zoom every frame.
Now we will start organising the code with plugins: small structs that bundle related systems, mostly to keep things tidy as the editor grows.
Update src/main.rs. The scene is the same,
we’re just wrapping it in a plugin and moving the camera out.
use bevy::prelude::*;fn main() { App::new() .add_plugins(DefaultPlugins) .add_plugins(EditorPlugin)New line. Register the editor plugin. After this, main never has to change again. .run();}New: a plugin that owns the whole editor. Every feature we add will register itself inside build.struct EditorPlugin;impl Plugin for EditorPlugin { fn build(&self, app: &mut App) { app.add_systems(Startup, setup_scene); }}fn setup_scene( mut commands: Commands, mut meshes: ResMut<Assets<Mesh>>, mut materials: ResMut<Assets<StandardMaterial>>,) {Delete the camera spawn here; CameraPlugin (next section) will own it from now on. commands.spawn(( Camera3d::default(), Transform::from_xyz(3.0, 3.0, 8.0).looking_at(Vec3::ZERO, Vec3::Y), )); commands.spawn(( DirectionalLight { illuminance: 5000.0, ..default() }, Transform::IDENTITY.looking_to(Vec3::new(-1.0, -2.0, -1.0).normalize(), Vec3::Y), )); commands.spawn(( Mesh3d(meshes.add(Cuboid::new(1.0, 1.0, 1.0))), MeshMaterial3d(materials.add(StandardMaterial { base_color: Color::srgb(0.7, 0.7, 0.7), perceptual_roughness: 0.85, ..default() })), Transform::IDENTITY, ));}Make a directory for our viewport module.
mkdir src/viewportCreate src/viewport/mod.rs.
pub mod camera; Moving the Camera
Let’s make the camera move. We need three things: the camera’s state (where it sits and what it looks at), the math that updates that state, and the system that reads your mouse and trackpad every frame and feeds the math.
Create src/viewport/camera.rs. We’ll start with the imports, the plugin setup, and the camera state.
use bevy::{ input::{ gestures::PinchGesture, mouse::{AccumulatedMouseMotion, AccumulatedMouseScroll, MouseScrollUnit}, }, prelude::*,};Spawns the camera once at startup, then runs control every frame to read input and move the camera. Same pattern as EditorPlugin, just scoped to the camera.pub struct CameraPlugin;impl Plugin for CameraPlugin { fn build(&self, app: &mut App) { app.add_systems(Startup, spawn_camera)Run spawn_camera once, when the app starts. .add_systems(Update, control);Register control in the Update schedule, so Bevy runs it once every frame (every tick) to read input and move the camera. }}Rather than store a position and rotation, we store the orbit parameters and rebuild the Transform from them each frame. Each input only touches one field; the camera recalculates its position from all four every frame, so nothing accumulates or goes out of sync.#[derive(Component)]pub struct OrbitCamera { pub focus: Vec3,The point the camera looks at and orbits around. pub distance: f32,How far the camera sits from focus. pub yaw: f32,Horizontal orbit angle (radians) around world +Y. pub pitch: f32,Vertical orbit angle (radians).}impl Default for OrbitCamera { fn default() -> Self { Self { focus: Vec3::ZERO, distance: 10.0, yaw: -0.7,Starting angles. A slight yaw plus a gentle downward pitch gives a three-quarter view: you see two faces of the cube and its top at once, instead of staring at it head-on. It's the angle Blender opens with, because it reads as 3D immediately. pitch: 0.5, } }}So far the camera only describes itself: focus, distance, yaw, and pitch are just four numbers. Now we need the camera to move based on the input.
So we add the methods that actually move the camera. Each one handles a single action: orbit_by spins the view, pan slides the focus, zoom dollies in or out. Both mouse and trackpad input end up here; the control function at the bottom decides which to call based on what the user is doing.
Each constant sets how fast the camera responds to one type of input: orbit speed, pan speed, zoom speed. Grouping them at the top means you can tweak the feel without digging into the logic below.const ORBIT_SENSITIVITY: f32 = 0.005;const PAN_SENSITIVITY: f32 = 0.0015;const WHEEL_ZOOM_SENSITIVITY: f32 = 0.12;const TRACKPAD_ZOOM_SENSITIVITY: f32 = 0.01;const PINCH_ZOOM_SENSITIVITY: f32 = 3.0;const TRACKPAD_MOTION_SCALE: f32 = 0.4;const MIN_DISTANCE: f32 = 0.5;const MAX_DISTANCE: f32 = 500.0;impl OrbitCamera {Turn a drag into a change in the two orbit angles. delta is how far the pointer moved this frame, measured in screen pixels. fn orbit_by(&mut self, delta: Vec2) { self.yaw -= delta.x * ORBIT_SENSITIVITY;Horizontal movement changes yaw (the left-right angle). Multiplying the pixel count by the tiny sensitivity converts it into a small angle in radians. We subtract so dragging right swings the view left, the way grabbing and turning the scene feels. self.pitch -= delta.y * ORBIT_SENSITIVITY;Vertical movement changes pitch (the up-down angle), the same way. Subtracting means dragging down tilts the camera up. }Slide the point the camera looks at, so the whole scene appears to move with the cursor. fn pan(&mut self, transform: &Transform, delta: Vec2) { let right = *transform.right();A unit vector pointing to the camera's own right, in world space. Bevy derives it from the camera's current rotation, so it always matches what you see. let up = *transform.up();A unit vector pointing to the camera's own up. Together, right and up span the flat plane you see on screen. let scale = PAN_SENSITIVITY * self.distance;How much world distance one pixel of drag covers. Multiplying by distance means you pan faster when zoomed out and slower when zoomed in, so it feels constant on screen. self.focus += (-right * delta.x + up * delta.y) * scale;Move the focus along those two screen directions by the scaled drag amount. The signs are chosen so the scene tracks your cursor instead of sliding the opposite way. }Move the camera nearer or further by changing only distance. amount is a small fraction, not a fixed step. fn zoom(&mut self, amount: f32) { self.distance = (self.distance * (1.0 - amount)).clamp(MIN_DISTANCE, MAX_DISTANCE);Multiply distance by (1.0 - amount): a positive amount shrinks it (zoom in), a negative one grows it (zoom out). Scaling rather than adding means each step feels proportional at any zoom level. clamp keeps the result between MIN and MAX so you can't pass through the focus or drift off to infinity. }Turn the four fields (focus, distance, yaw, pitch) into the camera's actual position and direction. The methods above only edit numbers; this is the step that makes them visible. fn apply_to(&self, transform: &mut Transform) { let rot = Quat::from_axis_angle(Vec3::Y, self.yaw) * Quat::from_axis_angle(Vec3::X, self.pitch);Build the camera's orientation from the two angles. A Quat (quaternion) is just a compact, glitch-free way to store a 3D rotation. from_axis_angle makes a rotation of yaw around the vertical Y axis and one of pitch around the sideways X axis; multiplying them combines both into a single orientation. transform.rotation = rot;Aim the camera in that combined direction. transform.translation = self.focus + rot * Vec3::new(0.0, 0.0, self.distance);Position the camera. (0, 0, distance) is a point straight behind the origin; rotating it by rot and adding focus places the camera that far back from the focus along its own view direction. Changing yaw or pitch sweeps this point around the focus, which is exactly what orbiting is. }}Create the camera entity with a default OrbitCamera, then call apply_to once so the camera is already positioned correctly when the scene opens.fn spawn_camera(mut commands: Commands) { let orbit = OrbitCamera::default(); let mut transform = Transform::IDENTITY; orbit.apply_to(&mut transform); commands.spawn((Camera3d::default(), transform, orbit));}Runs every frame. It reads mouse, scroll, and pinch input, decides orbit / pan / zoom, and applies the result. Every parameter is a request to the engine.fn control( mouse_buttons: Res<ButtonInput<MouseButton>>, keys: Res<ButtonInput<KeyCode>>, mouse_motion: Res<AccumulatedMouseMotion>, mouse_scroll: Res<AccumulatedMouseScroll>, mut pinch_reader: MessageReader<PinchGesture>, mut camera: Single<(&mut OrbitCamera, &mut Transform)>,Single asserts there's exactly one camera; it panics loudly if that ever stops being true.) { let (orbit, transform) = &mut *camera;Unpack the query: orbit holds the camera state, transform is its position in the world. let shift = keys.pressed(KeyCode::ShiftLeft) || keys.pressed(KeyCode::ShiftRight);True if either Shift key is down this frame. let ctrl = keys.pressed(KeyCode::ControlLeft) || keys.pressed(KeyCode::ControlRight) || keys.pressed(KeyCode::SuperLeft) || keys.pressed(KeyCode::SuperRight);SuperLeft/Right = ⌘ on macOS.Hold the middle button and move the mouse: Shift pans, otherwise orbit. if mouse_buttons.pressed(MouseButton::Middle) { let delta = mouse_motion.delta;How far the mouse moved since last frame, in screen pixels. if delta != Vec2::ZERO {Skip the math if there was no movement this frame. if shift { orbit.pan(transform, delta); } else { orbit.orbit_by(delta); } } }A mouse wheel reports Line units (discrete clicks) and zooms. A trackpad reports Pixel units (smooth) and orbits, or pans with Shift, or zooms with Ctrl/Cmd. let scroll = mouse_scroll.delta;Scroll distance this frame: x is horizontal, y is vertical. if scroll != Vec2::ZERO { match mouse_scroll.unit { MouseScrollUnit::Line => orbit.zoom(scroll.y * WHEEL_ZOOM_SENSITIVITY),Mouse wheel: each click is one discrete line; only y matters. MouseScrollUnit::Pixel => { let d = scroll * TRACKPAD_MOTION_SCALE;Scale down raw pixel distance; trackpad reports much larger values than mouse drag. if ctrl { orbit.zoom(d.y * TRACKPAD_ZOOM_SENSITIVITY);Ctrl/⌘ + two-finger drag = zoom. } else if shift { orbit.pan(transform, d);Shift + two-finger drag = pan. } else { orbit.orbit_by(Vec2::new(-d.x, -d.y));Two-finger drag = orbit. Both axes are flipped: dragging right spins the view left, dragging down tilts it up. } } } }macOS and iOS report a native pinch gesture. Sum this frame's deltas and zoom by them. let pinch: f32 = pinch_reader.read().map(|g| g.0).sum();Collect all pinch deltas this frame. g.0 is the scale factor: positive = fingers spreading apart = zoom in. if pinch != 0.0 { orbit.zoom(pinch * PINCH_ZOOM_SENSITIVITY); } orbit.apply_to(transform);Push the updated orbit state into the Transform, making this frame's input visible.}Update src/main.rs to declare the new module and register
CameraPlugin inside EditorPlugin:
CameraPlugin.use bevy::prelude::*;pub mod viewport;use viewport::camera::CameraPlugin;fn main() { App::new() .add_plugins(DefaultPlugins) .add_plugins(EditorPlugin) .run();}struct EditorPlugin;impl Plugin for EditorPlugin { fn build(&self, app: &mut App) { app.add_plugins(CameraPlugin) .add_systems(Startup, setup_scene); }}fn setup_scene( mut commands: Commands, mut meshes: ResMut<Assets<Mesh>>, mut materials: ResMut<Assets<StandardMaterial>>,) { commands.spawn(( DirectionalLight { illuminance: 5000.0, ..default() }, Transform::IDENTITY.looking_to(Vec3::new(-1.0, -2.0, -1.0).normalize(), Vec3::Y), )); commands.spawn(( Mesh3d(meshes.add(Cuboid::new(1.0, 1.0, 1.0))), MeshMaterial3d(materials.add(StandardMaterial { base_color: Color::srgb(0.7, 0.7, 0.7), perceptual_roughness: 0.85, ..default() })), Transform::IDENTITY, ));}Now let’s run it and see the camera respond to your inputs.
cargo runInfinite Grid Setup
You can orbit around the cube now, but there’s nothing to ground the scene: no horizon, no floor. We want Blender’s infinite grid: a ground plane with a red X axis line, a green Y axis line, and minor/major grid lines that fade out at the horizon.
Bevy 0.19 ships this as bevy_dev_tools::infinite_grid. We just need to turn the feature on and spawn the entity.
Update Cargo.toml to enable bevy_dev_tools.
bevy line changes; the rest of the file stays the same.[package]name = "bevy_tutorial_editor"version = "0.1.0"edition = "2024"[dependencies]bevy = { version = "=0.19", features = [ "bevy_dev_tools"] }# Bevy's recommended dev build profile..[profile.dev]opt-level = 1[profile.dev.package."*"]opt-level = 3Blender Conventions
Create the grid module inside viewport folder.
One thing worth noting before you read the code: this editor follows Blender’s axis convention, where X is left-right, Y is depth, and Z is up. Bevy is Y-up, so we swap Y and Z to keep it similar to Blender’s interface.
use bevy::{ dev_tools::infinite_grid::{InfiniteGrid, InfiniteGridSettings}, prelude::*,};Same plugin pattern as CameraPlugin: one Startup system that spawns the grid entity once.pub struct GridPlugin;impl Plugin for GridPlugin { fn build(&self, app: &mut App) { app.add_systems(Startup, spawn_grid); }}Spawn one entity with InfiniteGrid (the marker) and InfiniteGridSettings (colour and fade config).fn spawn_grid(mut commands: Commands) { commands.spawn(( InfiniteGrid, InfiniteGridSettings { x_axis_color: Color::srgb(0.80, 0.24, 0.24),Red X axis. z_axis_color: Color::srgb(0.33, 0.66, 0.33),Green. Despite the field being called z_axis_color, this draws the line the user sees as the Y axis (Blender convention). The naming comes from Bevy's internal Y-up coordinates. minor_line_color: Color::srgb(0.28, 0.28, 0.28),The thin lines between major cells, the fine grid detail. major_line_color: Color::srgb(0.40, 0.40, 0.40),The thicker lines that mark the main grid spacing, the coarser structure visible from a distance. fadeout_distance: 150.0,Grid fades beyond 150 m so the horizon stays clean. ..default() }, ));}Register the module by updating src/viewport/mod.rs.
pub mod camera;pub mod grid;Putting it Together
Update src/main.rs: add InfiniteGridPlugin and GridPlugin.
use bevy::dev_tools::infinite_grid::InfiniteGridPlugin;use bevy::prelude::*;pub mod viewport;use viewport::camera::CameraPlugin;use viewport::grid::GridPlugin;fn main() { App::new() .add_plugins(DefaultPlugins) .add_plugins(EditorPlugin) .run();}struct EditorPlugin;impl Plugin for EditorPlugin { fn build(&self, app: &mut App) { app.add_plugins((InfiniteGridPlugin, CameraPlugin, GridPlugin)) .add_systems(Startup, setup_scene); }}fn setup_scene( mut commands: Commands, mut meshes: ResMut<Assets<Mesh>>, mut materials: ResMut<Assets<StandardMaterial>>,) { commands.spawn(( DirectionalLight { illuminance: 5000.0, ..default() }, Transform::IDENTITY.looking_to(Vec3::new(-1.0, -2.0, -1.0).normalize(), Vec3::Y), )); commands.spawn(( Mesh3d(meshes.add(Cuboid::new(1.0, 1.0, 1.0))), MeshMaterial3d(materials.add(StandardMaterial { base_color: Color::srgb(0.7, 0.7, 0.7), perceptual_roughness: 0.85, ..default() })), Transform::from_xyz(0.0, 0.5, 0.0),The cube is 1 unit tall, so bumping it up by half a unit sets its base flush with the grid floor instead of half-buried. ));}cargo runIn upcoming posts, we’ll add click to select, a menu to spawn new shapes, keyboard tools to move, rotate, and scale them, materials and a toon shader, and finally saving and loading scenes plus importing .gltf models.